

The Python Cookiecutter library revolutionizes project development by offering streamlined approach to creating template projects and improving developer experience.
cookiecutter allows developers to quickly scaffold their projects with pre-defined structures, configurations, and best practices.
By abstracting away the intricacies of environment setup, cookiecutter enables developers to dive straight into coding, significantly reducing the time and effort required to get up and running. Embracing cookiecutter as a valuable tool can revolutionize the onboarding experience, enhance productivity, and empower developers to focus on what they do best: building innovative and high-quality software.
In this post, you will learn how to generate Python templates with cookiecutter and build new template projects from scratch. We will review usage examples and follow precise steps to help you develop your cookiecutter Python template project.
Developer Experience and Template Projects Matter
I will say that template projects are critical to the success of your organization.
In my organization, CyberArk, we were in the process of adopting a new technology: Serverless.
I was on a pioneering group working furiously to learn the ropes of this new technology. Eventually, we built a new Serverless service with numerous best practices such as infrastructure as code (AWS CDK), a dedicated CI/CD pipeline, and observability built in.
It was an excellent service and worked well.
However, now the team faced new challenges: building the second service and another challenge, even harder: helping news teams at CyberArk create the same levels of serverless services with the same tools. That's where template projects come in handy.
We turned the first service, that state-of-the-art service into a template project - a simple yet generic enough service so any team can use it as a starting point. It was a fully working repository with all the bells and whistles that help the development teams focus on what matters most - the business domain. Read more about it in my platform engineering blog post.
In one instance, a team developing a serverless service with the template got to the design partners' stages (when an actual customer uses the service) in just four months. For an enterprise such as CyberArk, this was unheard of and very quick.
Now that we understand the incentive for template projects, let's start with generating a new repository from a template with cookiecutter and then process to create our template.
Installing Cookiecutter
First, make sure you install Python 3.
Then, run the following command:
pip install cookiecutteror on a mac:
brew install cookiecutterIf you require more assistance, read the official installation guidelines.
Cookicutter - The User Experience
Before creating templates, we should understand what kind of user experience our developers will get. We should strive to make it simple, fast and remove as many manual steps as possible.
Creating a new working developer environment is one of the most complex challenges developers often face. We can use cookiecutter to build our project and set up the developer environment—more on that in the 'hooks' section.
Let's create a new Serverless service from my cookiecutter serverless project, based on my AWS Lambda handler cookbook project.
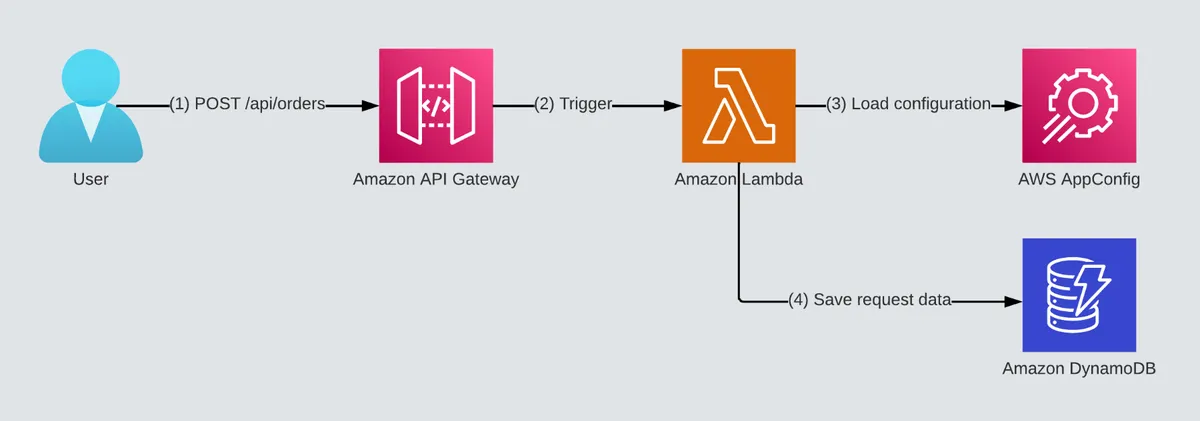
The serverless service template has numerous features:
- CDK infrastructure with infrastructure tests and security tests.
- CI/CD pipelines based on Github actions that deploys to AWS with python linters, complexity checks and style formatters.
- Makefile for simple developer experience.
- The AWS Lambda handler embodies Serverless best practices and has all the bells and whistles for a proper production ready handler.
- AWS Lambda handler 3 layer architecture: handler layer, logic layer and data access layer.
- Features flags and configuration based on AWS AppConfig.
- Unit, infrastructure, security, integration and E2E tests.
And the architecture diagram:
The Setup
Run this command:
cookiecutter gh:ran-isenberg/cookiecutter-serverless-pythonAnswer the following questions to scaffold the project:

Cookiecutter will start to scaffold the project and initialize a working environment.
Once completed, a message will appear: "Project successfully initialized."
That's it! Simple as that, you can start developing your shiny new serverless service and deploy it to AWS.
If you liked the project and the experience, don't be a stranger and give it a star :)
Create Your Own Template
Now that we understand what we want to achieve, let's build it.
Repository Structure
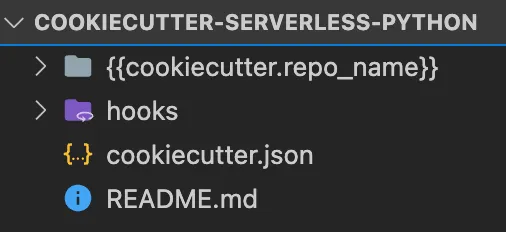
Start with an empty repository. You will need to add four files at the top level of the project:
- Readme file - explain the project's purpose and provide setup instructions.
- cookiecutter.json - this file provides cookiecutter with the configuration and scaffold parameters to use when cloning a new project. More on that below.
- The root folder of the template project you wish to provide.
- Hooks folder - used for advanced use cases; see below.
So you end up with something that loos like this:
Let's go over the main folder, the hooks folder and cookiecutter.json files.
cookiecutter.json
In this file, you define cookiecutter's scaffolding parameters which impact the questions presented to the user during the initial setup. You can choose whatever you want, but I'd go with the following example as a starting point:
The provided values default if the user presses enter as an answer and provides no other input.
The "_copy_without_render" part helps add files and folders you don't want cookiecutter to go over and copy as is.
The author, email, and descriptions parts can be injected into the template readme file and poetry.toml descriptions section.
See the template pyproject.toml and template README for examples.
There's also support for multi choice options as described in the cookiecutter choice variables documentation.
Main Template Folder
This is the entry folder for your template project. You must rename it to a name that cookiecutter can recognize and scaffold. All files beneath it will be added and scaffolded.
In my template, I renamed it to '{{cookiecutter.repo_name}}'. Notice that the 'repo_name' is the parameter defined in the cookiecutter.json file.
Usually, under the main folder, you'd add another folder for the service name, which I defined as '{{cookiecutter.service_name}}.'
So it can look like this:
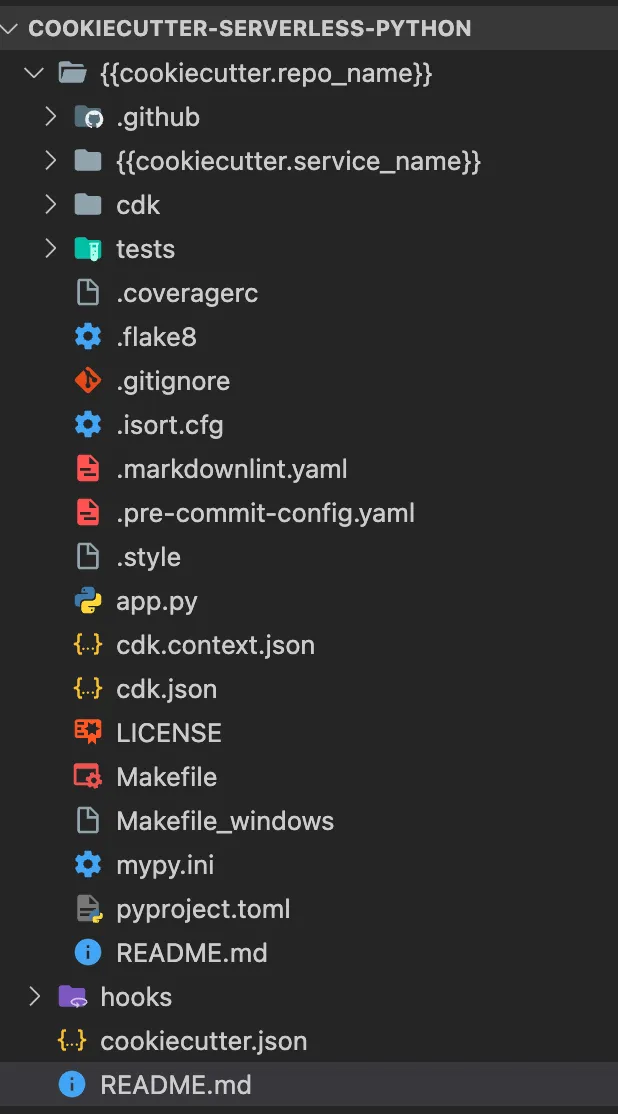
Not all folders require scaffolding support, and you can decide what folders remain constant and which are renamed.
Notice how the inner folder has its .toml file for poetry, .github for CI/CD workflows, CDK folder for deployment, tests folder, and other required folders. You can add whatever you wish.
One crucial issue you must know is that scaffolding breaks Python's import path. Since the main folder is dynamic and determined by the user when they answer cookiecutter questions, it means that are Python import path declarations require us to edit them too.
Here's an example how you overcome it:
Notice lines 10-12 and how we import the files with scaffolding support.
The complete file can be found in the template handler on GitHub.
You can use to method to rename any values in any file.
Hooks Folder
The hooks folder is optional, but I suggest you implement it too.
Hooks are code run either before the cookiecutter rename process or after it is finished.
You can use it to conduct input validation on the questions and set up an entire developer environment once the project is scaffolded.
Pre Hook
You can use the pre-hook for input validation on the user's strings. If you recall, some of these strings are used as service or repository names. They are used in the import path of the generated repository files, so they must conform to Python's naming convention.
You can use the following example:
Post Hook
This is where the magic happens. We've talked a lot about the importance of developer experience, and the post hook is where you can make a difference.
You can write scripts and initialize the developer environment so the developer can get into writing new code instead of wasting time on manual and tedious environment setups.
Here's an example of my post-hook script where I initialize git, install all poetry dependencies, and install pre-commit so all checks run before a PR can work.
Testing & Debugging Locally
It sounds pretty simple, right?
However, it won't work for you the first time. It never does. So you need to debug, fix and debug again.
cookiecutter supports running from a local folder, not just a GitHub repository URL.
You can develop the new template repository locally, make changes and then run cookiecutter from the terminal and see if it works:
cookiecutter {path-to-project-on-local-disk}For more tips & tricks, read the official docs: https://cookiecutter.readthedocs.io/en/stable/